|
|
|
|
|
|
|
|
|
|||||||


|
Features
Do It Yourself: Bracketing Bracketing was a „must‰ in the days of film because you couldn‚t see how your pictures turned out until they were developed and printedˆ if your exposure wasn‚t correct, that once-in-a-lifetime shot could be ruined. Photographers used to bracket manually, actually changing the aperture or shutter speed by hand. As cameras became more sophisticated, automatic bracketing was added. Even
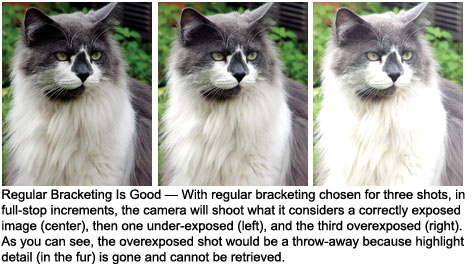
with a digital camera, bracketing Bracketing records at least two extra frames for every picture you take, so learn to use it wisely. First, decide what increments of exposure change you want to use. Many cameras will allow you to select full stops, half stops, or third stops of differences between pictures. Pick full stops to begin with so you can easily see the results. Then, fine tune the range down to half or third stops. Let‚s say you‚ve set your camera to Aperture Priority, selected f-4, and your camera picks 1/00 sec as its „correct‰ exposure. If one-stop bracketing is selected, the first exposure will be at 1/100 sec, the second at 1/200 sec (the equivalent of one stop under) and the third at 1/50 sec (equal to one stop over). If your camera were set to Shutter Priority at 1/00 sec, the f-stops would change: f-4, f-5.6, f-2.8. When set to Program, the camera will decide whether to change the aperture, shutter speed, or both. If any of the f-stops or shutter speeds are out of range, most cameras will give you a warning or just pick a different combination to assure that the images are bracketed correctly. The best times to bracket are under extremely bright or low lighting conditions, though some photographers do it routinely even with good lighting. When shooting under bright lighting, your overexposed shot will usually be wastedˆ the highlights may be way too light and the picture unusable. In this situation use „smart‰ bracketingˆ shooting one shot at the camera‚s suggested exposure, then one underexposed, and a second one underexposed even more.
Of course, you can also go the other way, by setting the Exposure Compensation to overexpose (the plus side), which would give you one picture overexposed, another „correctly‰ exposed and a third overexposed even more. That would be a good way to go for overly-bright scenes, such as you find at the beach or in snow country, where your camera‚s light meter usually gets fooled by the extreme brightness and underexposes, making most pictures look too dark. I don‚t recommend using full-stops for most „smart‰ bracketing situations because they might be too extreme. Once you understand the concept, set your increments to half stops when bracketing normally-lit scenes. You might want to try larger increments, though, when the light is very low or extremely brightˆ you‚ll have to experiment to find what works best for you under those circumstances. Once you learn how to „smart‰ bracket by combining exposure compensation adjustments along with your camera‚s auto-bracketing feature, you‚ll begin to get perfectly exposed pictures and won‚t have to rely on your imaging program to bail you out. ˆArthur Bleich |
||||||
|
|
|||||||
|
©
2004 D.C. Publications, Inc. All Rights Reserved. |
|||||||
 is
a valuable tool because it‚s hard to check exposure accuracy on
the itty-bitty display unless you‚re willing to interrupt the flow
of shooting by bringing up a histogram ˆif your camera has that
featureˆ which is a graphic display used to confirm correct exposure
values. Light falling on the monitor or one that‚s been set brighter
or dimmer for easier viewing can make it impossible to see subtle
nuances. Only by viewing your picture in an imaging program would
you be able to tell if you hit the exposure on the nose or not.
If not, even Photoshop magic may not be enough to resurrect a poorly
exposed photo, especially one with burned out highlights; you can‚t
bring back what isn‚t there.
is
a valuable tool because it‚s hard to check exposure accuracy on
the itty-bitty display unless you‚re willing to interrupt the flow
of shooting by bringing up a histogram ˆif your camera has that
featureˆ which is a graphic display used to confirm correct exposure
values. Light falling on the monitor or one that‚s been set brighter
or dimmer for easier viewing can make it impossible to see subtle
nuances. Only by viewing your picture in an imaging program would
you be able to tell if you hit the exposure on the nose or not.
If not, even Photoshop magic may not be enough to resurrect a poorly
exposed photo, especially one with burned out highlights; you can‚t
bring back what isn‚t there.  To
use smart bracketing, simply select Exposure Compensation in your
menu (or with a camera button if there is one) and set it to the
underexposure side by a full stop, half-stop, or third stop. Let‚s
say you select minus one, a full stop. Your camera‚s „correct‰ exposure
will now be underexposed by one stop. So when you bracket, the bracketing
sequence will remain the same (correct, under, and over) but your
exposures will really be „under by one stop,‰ „under by two stops,‰
and „correct.‰ You‚ve now eliminated the usually „wasted‰ overexposed
picture in the sequence and have begun to bend bracketing to your
will.
To
use smart bracketing, simply select Exposure Compensation in your
menu (or with a camera button if there is one) and set it to the
underexposure side by a full stop, half-stop, or third stop. Let‚s
say you select minus one, a full stop. Your camera‚s „correct‰ exposure
will now be underexposed by one stop. So when you bracket, the bracketing
sequence will remain the same (correct, under, and over) but your
exposures will really be „under by one stop,‰ „under by two stops,‰
and „correct.‰ You‚ve now eliminated the usually „wasted‰ overexposed
picture in the sequence and have begun to bend bracketing to your
will.